I still remember the first time someone handed me one of these at a New Year party. I bit into it, not expecting much—and then stopped mid-chew. That crunch. That peanut butter richness layered with something distinctly Butterfinger-ish. Butterfinger Balls aren’t your average party dessert, and they’ve got this way of disappearing faster than you can say “where’d they go?” They’re room temperature desserts that hold their shape beautifully, which means no stress about keeping them chilled during your Christmas gathering.
What makes these peanut butter crunch balls so compelling is their texture contrast. You get creamy, crunchy, sweet, and slightly salty all at once. The base is essentially a no-bake dough made with peanut butter, softened butter, graham crackers, and those iconic orange-wrapped candy bars we all grew up sneaking from the candy bowl. Then the whole thing gets dipped in chocolate, which adds that glossy snap when you bite through. It’s comfort food meets celebration—angel food candy vibes with zero actual angel food involved.
What Makes These Peanut Butter Graham Cracker Balls Different
Traditional peanut butter balls are great, sure. But here’s where Butterfinger Balls pull ahead: the crushed candy bars bring a honeycomb-like texture that’s hard to replicate with anything else. Graham cracker crumbs add structure and a hint of that nostalgic s’mores flavor without being overpowering. The result feels more sophisticated than your standard no-bake treat, yet it’s still approachable enough for kids to help you roll them.
Another thing they don’t require refrigeration once they’re set. Room temperature desserts are underrated, especially during holiday hosting when your fridge is already jammed with casserole dishes and leftover pie. These Christmas candy balls sit happily on a serving platter for hours without turning into a sticky mess. That alone makes them worth adding to your celebrating sweets rotation.
Ingredients That Actually Matter
Here’s what you need to make about 20 Butterfinger Balls. Resist the urge to swap ingredients just because they “seem similar” trust me, I’ve learned this the hard way.
- 1 cup creamy peanut butter (not the natural kind stick with Jif or Skippy)
- 4 tablespoons softened butter
- 1 teaspoon vanilla extract
- 1 cup powdered sugar
- ¾ cup graham cracker crumbs
- ½ cup crushed Butterfinger bars
- 8 ounces chocolate bark or chocolate chips
- Optional: extra crushed Butterfinger, sprinkles, or flaky sea salt for topping
The peanut butter is critical. Natural varieties separate and leak oil, which throws off the entire texture. You want the processed stuff here it binds better and gives you that smooth, moldable dough. The butter adds richness without making things greasy. Graham crackers provide the structural backbone, and the Butterfinger candy recipe element is what transforms this from “nice” to “I need the recipe.”
How to Make Angel Food Candy-Style Treats
Start by beating the peanut butter and softened butter together. Use a mixer if you have one it makes the job easier and gets the mixture fluffier. Add the vanilla, then gradually incorporate the powdered sugar. Go slow here. If you dump it all in at once, you’ll end up with a sugar cloud in your kitchen and a gritty mixture that won’t come together properly.
Once the dough looks smooth and cohesive, fold in the graham cracker crumbs and crushed Butterfinger pieces. The dough should be firm enough to roll but still slightly sticky. If it’s too loose, add a tablespoon more of graham cracker crumbs. Too stiff? A tiny bit more softened butter will bring it back. This is where experience helps, but don’t overthink it just aim for a Play-Doh-like consistency.
Shaping and Chilling New Year Sweets
Line a baking sheet with parchment paper. Scoop out about 1 to 1½ tablespoons of dough per ball and roll them between your palms. They don’t need to be perfectly round honestly, a little irregularity makes them look homemade in the best way. Place each one on the sheet with a bit of space between them, then pop the whole tray into the freezer for 30 minutes. This step isn’t optional. Cold dough holds its shape when you dip it in chocolate. Room temperature dough will fall apart and create a frustrating mess.
Butter Candy Coating Technique
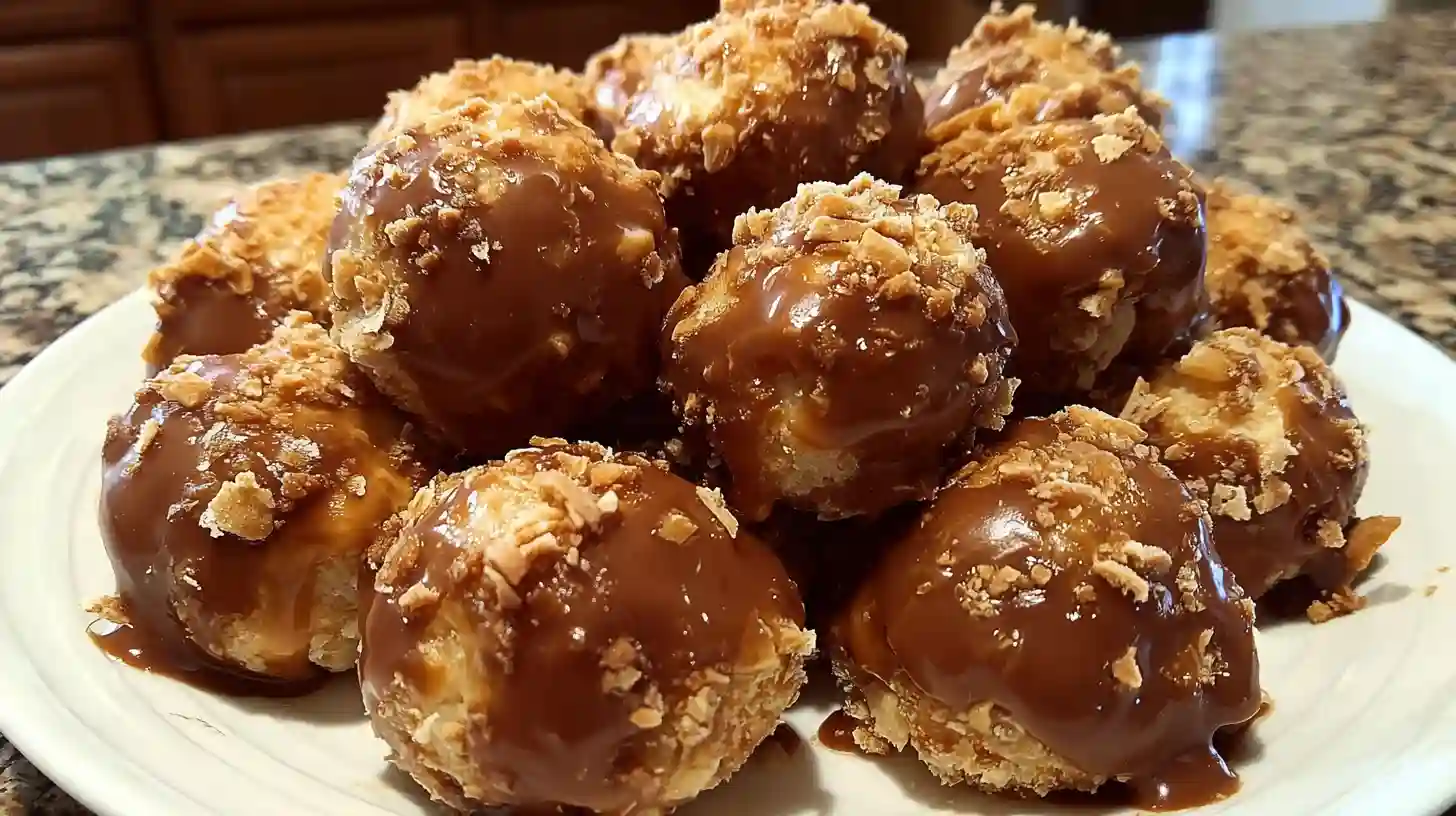
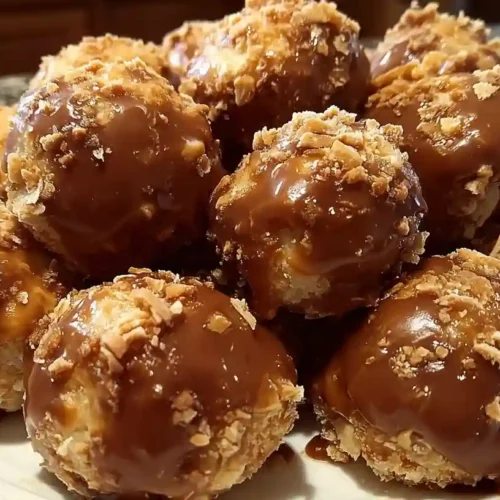
Melt your chocolate in a microwave-safe bowl using 30-second intervals at 50% power. Stir between each burst. The goal is to heat it just enough that it flows smoothly but doesn’t seize or burn. Some people prefer a double boiler for more control that works too. Once the chocolate is melted and silky, pull your chilled balls from the freezer. Dip each one using a fork or a dipping tool, letting excess chocolate drip back into the bowl. You can coat them entirely or leave a little peek of the peanut butter layer showing both look great.
While the chocolate is still wet, add your toppings. A sprinkle of crushed Butterfinger gives a visual cue about what’s inside. Holiday sprinkles work for Christmas candy balls. Flaky sea salt adds a gourmet touch that balances the sweetness. Once decorated, let them sit at room temperature until the chocolate hardens completely. If you’re in a hurry, 10 minutes in the fridge will speed things up, but they’ll firm up on their own eventually.

Pro Tips for Perfect Celebrating Sweets
- Use chocolate bark instead of chips if you can find it bark melts smoother and sets with a glossy finish
- Chill your dough balls thoroughly; warm dough won’t hold together during dipping
- Work quickly when coating melted chocolate starts to cool and thicken as you go
- If your chocolate gets too thick, reheat it gently in 10-second bursts
- Store finished balls in an airtight container with parchment between layers to prevent sticking
Variations on the Butterfinger Candy Recipe
Once you’ve made the base recipe a few times, it’s fun to experiment. Swap Butterfingers for Reese’s cups to make peanut butter cup balls. Use crushed Oreos instead of graham crackers for a cookies-and-cream version. Dark chocolate instead of milk chocolate gives a less sweet, more grown-up flavor. You can even roll the finished balls in crushed pretzels or toasted coconut instead of dipping them in chocolate—unconventional, but surprisingly good.
For a holiday twist, add a drop of peppermint extract to the dough and top with crushed candy canes. Or mix in mini chocolate chips along with the Butterfinger pieces for extra chocolate intensity. The dough base is forgiving, so feel free to treat it like a template rather than a strict rulebook.
Troubleshooting Common Issues
Dough too crumbly? You probably used natural peanut butter or didn’t add enough butter. Fix it by kneading in a tablespoon of softened butter at a time until it holds together. Dough too sticky? Add more graham cracker crumbs, a tablespoon at a time. Chocolate coating cracking? The balls were too cold when you dipped them—let them sit at room temperature for 5 minutes before coating. Chocolate not sticking? Your chocolate might have seized from moisture or overheating. Start with fresh chocolate and work in a dry environment.
Smart Substitutions
- Swap almond butter for peanut butter if you need a peanut-free option
- Use gluten-free graham crackers to make these celiac-friendly
- Replace Butterfingers with Heath bars or Skor for a toffee flavor
- Try coconut oil instead of butter for a dairy-free version
- Use sugar-free chocolate and a sugar substitute for a lower-carb treat
Storage and Serving for Room Temperature Desserts
Store Butterfinger Balls in an airtight container at room temperature for up to 5 days, or refrigerate them for up to 3 weeks. Layer parchment paper between stacks to keep the chocolate from sticking. They also freeze beautifully for up to 3 months—just thaw them at room temperature for about 30 minutes before serving. These Christmas candy balls travel well, which makes them ideal for cookie swaps, potlucks, or gift boxes. Wrap a few in cellophane, tie with a ribbon, and you’ve got an impressive homemade gift.
Frequently Asked Questions
Can I use natural peanut butter for Butterfinger Balls?
Natural peanut butter separates and releases oil, which makes the dough too loose to roll properly. Stick with processed brands like Jif or Skippy for best results.
How long do these New Year sweets keep?
At room temperature in an airtight container, they last about 5 days. Refrigerated, they stay fresh for 3 weeks. Frozen, they’ll keep for up to 3 months.
Can I make peanut butter crunch balls ahead of time?
Absolutely. Roll the dough balls and freeze them for up to a month. Dip them in chocolate the day you plan to serve them, or dip and freeze them fully assembled.
What’s the best chocolate for coating butter candy?
Chocolate bark melts smoothly and sets with a glossy finish. If using chocolate chips, add a teaspoon of coconut oil to help with consistency.
Why is my chocolate coating cracking?
The dough balls were likely too cold when dipped. Let them sit at room temperature for 5 minutes after removing from the freezer, then coat them in chocolate.
Can I skip the graham crackers in this Butterfinger candy recipe?
Graham crackers provide structure and absorb excess moisture. Without them, the dough may be too soft to shape properly. You could substitute crushed vanilla wafers or digestive biscuits.
Are Butterfinger Balls safe to leave out as room temperature desserts?
Yes, once the chocolate coating has set, they’re stable at room temperature for several hours. Just keep them in a cool spot away from direct sunlight or heat sources.
Butterfinger Balls Recipe
Equipment
- Electric mixer or stand mixer
- Mixing bowl
- Baking sheet
- Parchment paper
- Microwave-safe bowl
- Fork or dipping tool
Ingredients
Dough Ingredients
- 1 cup creamy peanut butter avoid natural varieties
- 4 tablespoons softened butter ½ stick
- 1 teaspoon vanilla extract
- 1 cup powdered sugar
- ¾ cup graham cracker crumbs
- ½ cup crushed Butterfinger bars
Coating Ingredients
- 8 ounces chocolate bark or chocolate chips
- Optional toppings: crushed Butterfinger bars, sprinkles, or flaky sea salt
Instructions
- In a mixing bowl, beat together the peanut butter and softened butter using an electric mixer on medium speed until smooth and creamy.
- Add the vanilla extract and mix until fully incorporated.
- Gradually add the powdered sugar in small increments, mixing on low speed. Scrape down the sides of the bowl as needed to ensure even mixing.
- Fold in the graham cracker crumbs and crushed Butterfinger bars until the dough is well combined and holds together.
- Line a large baking sheet with parchment paper. Scoop out 1 to 1½ tablespoons of dough and roll into balls. Place on the prepared baking sheet.
- Freeze the dough balls for 30 minutes until completely firm.
- Melt the chocolate in a microwave-safe bowl using 30-second intervals at 50% power, stirring between each interval until smooth.
- Remove the chilled balls from the freezer. Dip each ball into the melted chocolate using a fork or dipping tool, allowing excess chocolate to drip off.
- Place the coated balls back on the parchment-lined baking sheet. While the chocolate is still wet, sprinkle with crushed Butterfinger, sprinkles, or sea salt if desired.
- Let the chocolate coating set completely at room temperature or refrigerate for 10 minutes to speed up the process.
Notes
- Use processed peanut butter like Jif or Skippy for best texture. Natural peanut butter is too oily and will make the dough too loose.
- Chocolate bark melts more smoothly than chocolate chips and sets with a glossy finish. If using chips, add a teaspoon of coconut oil for better consistency.
- Store in an airtight container at room temperature for up to 5 days, refrigerate for up to 3 weeks, or freeze for up to 3 months.
- Let frozen balls thaw at room temperature for 30 minutes before serving.