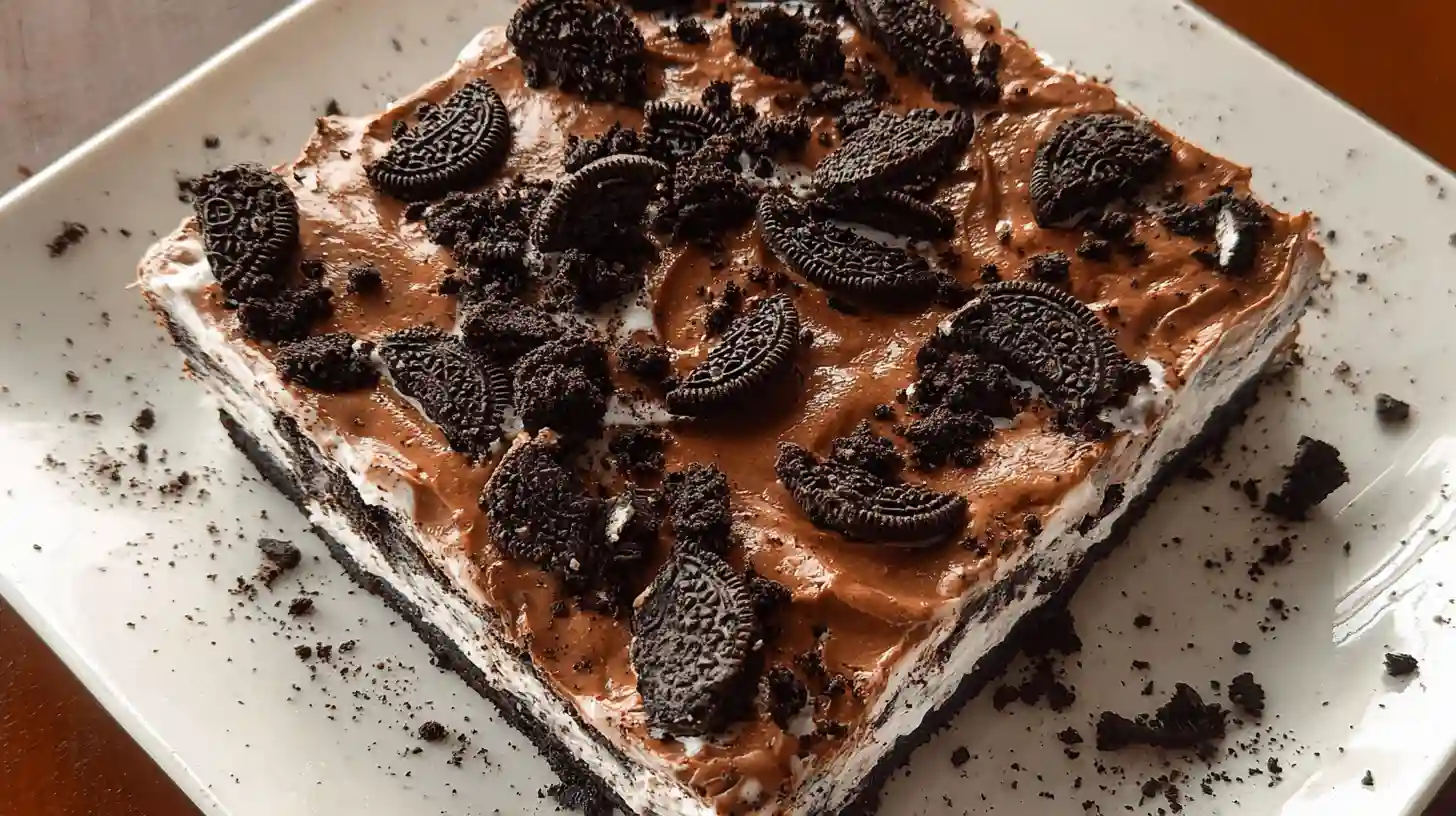
Some desserts just have a way of disappearing before you even set the spoon down. This Oreo Dirt Cake is exactly that kind of recipe – creamy, chocolatey, and layered with crushed Oreos that give it that signature “dirt” look everyone loves. It comes together without turning on the oven, and the texture is somewhere between a thick mousse and a cold cheesecake. Once you try it, it becomes the thing people ask you to bring everywhere.
The base is a simple mix of cream cheese, powdered sugar, and whipped topping. The chocolate layer uses instant chocolate pudding, which keeps it light but rich at the same time. Crushed Oreos go both inside the layers and on top, and that combination of crunch against the smooth filling is honestly what makes this dessert worth every bite.
Everything You Need for This Recipe
Nothing complicated here. These are pantry staples most people already have or can grab quickly:
- 1 package (14.3 oz) Oreo cookies
- 8 oz cream cheese, softened
- 1/4 cup unsalted butter, softened
- 1 cup powdered sugar
- 2 packages (3.9 oz each) instant chocolate pudding mix
- 3 1/2 cups cold whole milk
- 12 oz frozen whipped topping (Cool Whip), thawed
Optional but fun: gummy worms for decorating the top. If you’re serving this as a chocolate dirt dessert at a casual gathering, gummy worms pressed into the crushed Oreo topping make it look exactly like a garden pot – which gets a reaction every single time.
How To Make Oreo Dirt Cake Step by Step
- Crush the Oreos in a food processor or zip-lock bag until fine. Set aside about 1 cup for the topping.
- Beat the softened cream cheese, butter, and powdered sugar together until smooth and creamy. No lumps.
- In a separate bowl, whisk the chocolate pudding mix with cold milk for about 2 minutes. Let it set for 5 minutes.
- Fold the whipped topping into the pudding mixture gently, keeping it light and airy.
- Now fold the cream cheese mixture into the pudding mixture until fully combined.
- In a large dish or trifle bowl, layer crushed Oreos, then the cream filling, then more crushed Oreos. Repeat if your dish is deep enough.
- Finish with the reserved crushed Oreos on top to look like dirt.
- Refrigerate for at least 2 hours before serving – overnight is even better.

Tips That Actually Make a Difference
Softened cream cheese is non-negotiable. Cold cream cheese will leave small lumps in your filling no matter how long you mix it, and those don’t blend out. Pull it from the fridge at least 45 minutes ahead.
For a cleaner dirt cake casserole look when serving, use a 9×13 dish instead of a round bowl. The layers show up more evenly and you can cut it into neat squares. A trifle bowl is prettier for presentation, but the flat dish is easier to serve from.
Don’t rush the chill time. Two hours is the minimum, but overnight gives the layers time to fully set and the flavors to meld together. The texture is noticeably better the next day.
Ingredient Swaps Worth Knowing
If you want a lighter version, swap the regular cream cheese for reduced-fat and use light Cool Whip. The texture will be slightly less dense but still very good. You can also use vanilla pudding instead of chocolate if you want a less intense chocolate flavor – some people prefer that balance with the Oreo cookies already adding chocolate throughout.
No Cool Whip? Freshly whipped heavy cream works fine. Whip about 1 1/2 cups of heavy cream to stiff peaks and fold it in the same way. It gives a slightly richer, less sweet result – which honestly is not a bad thing in this dirt recipe Oreo version.
Fun Variations to Try
The classic chocolate Oreo dirt cake is already great, but the base recipe is flexible. A few variations that work well:
- Use Golden Oreos and vanilla pudding for a “sand” version – lighter color, milder flavor
- Add a layer of sliced strawberries between the filling layers for a chocolate-berry combination
- Serve in individual cups or small flower pots for a more visual presentation
- Mix mini chocolate chips into the filling for extra texture
- Use mint Oreos and add a drop of peppermint extract to the cream filling for a cool, seasonal twist
Storage and How Long It Keeps
Cover tightly with plastic wrap or a lid and refrigerate. This easy Oreo dirt cake keeps well for up to 4 days in the fridge. The Oreo topping will soften slightly after the first day, but most people actually prefer the texture once it has absorbed a little moisture from the filling. If you want to keep some crunch, hold back a portion of the crushed Oreos and add them right before serving.
Freezing works too. Freeze the assembled dessert (without the Oreo topping) for up to 6 weeks. Thaw in the fridge overnight and add the crushed Oreos before serving. The filling holds up well and the texture stays smooth after thawing.
FAQ
Can I make this Oreo dirt cake the night before?
Yes, and it’s actually recommended. The layers set better and the flavor deepens after a full night in the fridge. Just add the final Oreo topping the morning of if you want it to stay a bit crunchier.
What size dish should I use?
A 9×13 inch pan is the standard for a dirt cake casserole style. You can also use a large trifle bowl or individual cups depending on how you want to serve it.
Does this recipe use cook time?
No cooking at all. This is a fully no-bake dirt dessert cake. The only time involved is mixing and chilling.
Can I use homemade whipped cream instead of Cool Whip?
Absolutely. Whip 1 1/2 cups of cold heavy cream to stiff peaks and fold it in just like you would the Cool Whip. The result is a bit richer and slightly less sweet.
How do I make this dirt cake recipe with easy chocolate pudding if I only have cook-and-serve pudding?
Cook-and-serve pudding needs to be fully cooled before using – it won’t set the same way as instant. It can work, but instant pudding is much easier and gives a more consistent texture in this recipe.
Is this safe for kids with nut allergies?
The base recipe contains no nuts, but always check the labels on your specific Oreo package and pudding mix for any cross-contamination warnings, as these can vary by region and production facility.
Oreo Dirt Cake
Equipment
- 9×13-inch baking dish
- Electric hand mixer
- Food processor or zip-lock bag
- Large mixing bowls
Ingredients
- 1 package (14.3 oz) Oreo cookies crushed fine
- 8 oz cream cheese softened
- 1/4 cup unsalted butter softened
- 1 cup powdered sugar
- 2 packages (3.9 oz each) instant chocolate pudding mix
- 3 1/2 cups cold whole milk
- 12 oz frozen whipped topping (Cool Whip) thawed
Instructions
- Crush the Oreos in a food processor until fine. Set aside about 1 cup for the topping.
- Beat the softened cream cheese, butter, and powdered sugar together until completely smooth.
- Whisk the chocolate pudding mix with cold milk for 2 minutes, then let sit for 5 minutes to thicken.
- Fold the whipped topping into the pudding mixture gently until combined.
- Fold the cream cheese mixture into the pudding mixture until fully blended.
- Layer crushed Oreos, then filling, then more Oreos in your dish. Repeat if space allows.
- Top with the reserved crushed Oreos to look like dirt.
- Refrigerate for at least 2 hours before serving. Overnight is best.
Notes
- Soften cream cheese fully before mixing to avoid lumps.
- Use a 9×13 dish for a classic dirt cake casserole style, or a trifle bowl for presentation.
- Add gummy worms to the top for a fun visual effect.
- Keeps in the fridge for up to 4 days, tightly covered.