
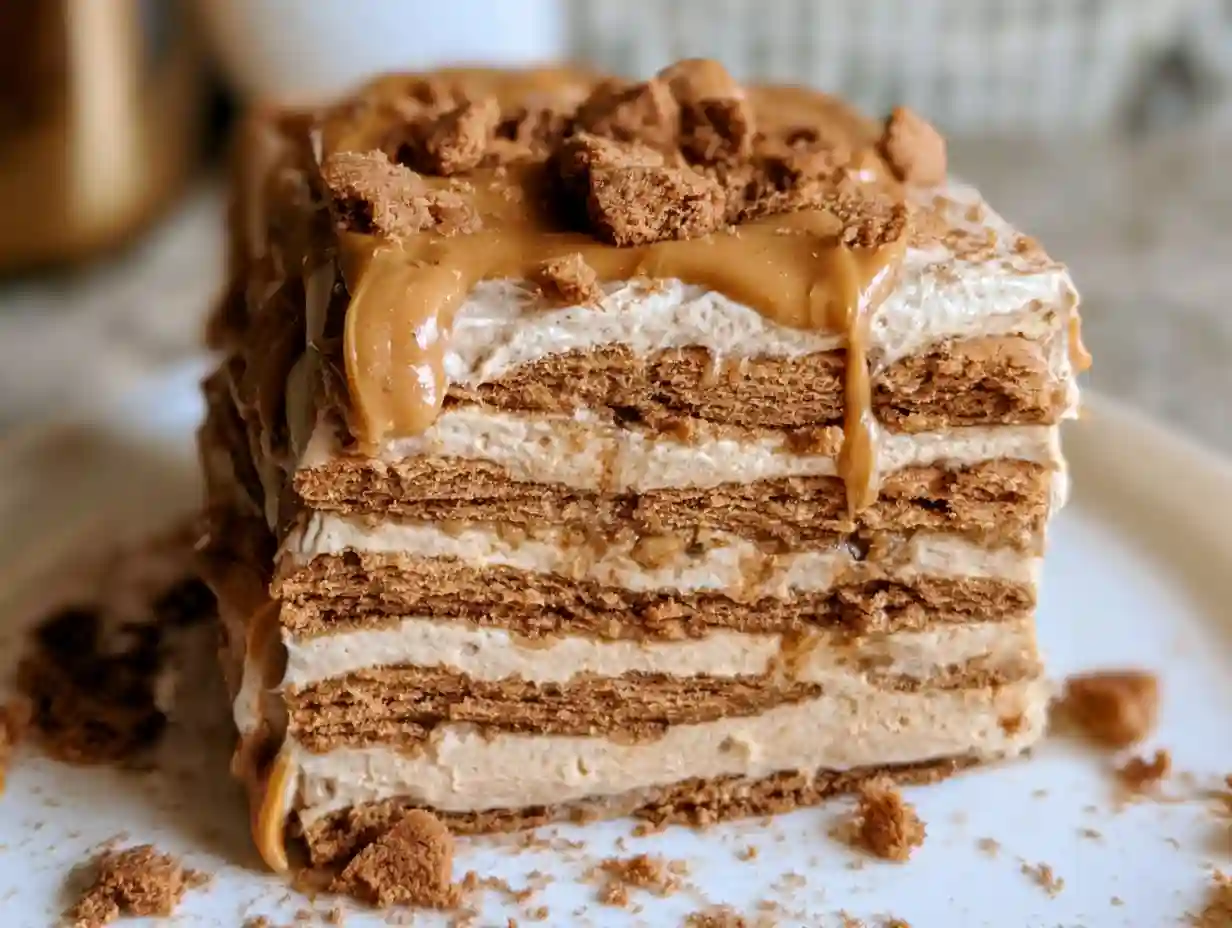
There’s something magical about desserts that come together without turning on the oven. This No-Bake Cookie Butter Icebox Cake has become my go-to when I need to impress guests but don’t want to spend hours in the kitchen. The first time I made this Biscoff Icebox Cake Recipe Easy version, I was skeptical that cookies could transform into something so luxuriously cake-like. But after one bite, I was completely hooked.
The secret lies in letting time do the work. Those crisp Lotus Biscoff cookies soften overnight in the fridge, absorbing moisture from the whipped cream filling until they reach this perfect tender texture that melts on your tongue. It’s the kind of dessert that makes people ask for the recipe before they’ve even finished their slice. And honestly, making this No Bake Biscoff Icebox Cake feels almost like cheating because it’s so simple yet delivers such incredible results.
What really sets this Speculoos Icebox Cake apart is that warm, caramelized spice flavor you get from the cookies. It’s comforting and familiar but still feels special enough for celebrations. Plus, since this Biscoff Cookie Icebox Cake needs to chill anyway, you can make it the day before and just enjoy your party instead of stressing over last-minute baking.
Why This Biscoff Icebox Cake Works Every Time
The beauty of this Lotus Biscoff Icebox Cake is in its simplicity. You’re basically alternating layers of cookies and cream, then letting physics and patience create something extraordinary. The cookies pull moisture from the whipped filling, softening into layers that taste like the most incredible cake you’ve ever had. It’s that same principle behind tiramisu or traditional icebox cakes, but with the addictive flavor of cookie butter that everyone’s obsessed with right now.
I’ve tested this Butter Butter Icebox Cake with different pan sizes and cookie arrangements, and the method is forgiving enough that you really can’t mess it up. Whether you’re using a standard loaf pan or something slightly different, you’ll end up with gorgeous layers that slice beautifully. The key is making sure your cream mixture is thick enough to hold those cookies in place while they soften.
One thing I love about this Biscoff Cookie Butter Icebox Cake is how it travels. Since it’s already chilled and holds its shape well, you can transport it to potlucks or dinner parties without worrying about it falling apart. Just keep it cold until serving time, and you’re golden.
- 2 cups heavy cream, cold
- 1/2 cup Lotus Biscoff cookie butter spread, plus extra for drizzling
- 1/3 cup mascarpone cheese, room temperature
- 1 teaspoon pure vanilla extract
- 2 tablespoons powdered sugar
- Pinch of kosher salt
- 2 packages Lotus Biscoff cookies (about 64 cookies total)
- Crushed Biscoff cookies for garnish
The ingredient list for this No-Bake Biscoff Icebox Cake is refreshingly short, but each component plays a crucial role. The heavy cream whips up into cloud-like peaks that lighten the richness of the cookie butter. Mascarpone adds stability and a subtle tang that balances the sweetness. And those Biscoff cookies are the star of the show, bringing their signature caramelized, spiced flavor to every single layer.
When you’re assembling this Biscoff Icebox Cake Slice worthy dessert, take your time with the layers. I like to arrange the cookies so they fit snugly without gaps, which gives you those clean, defined lines when you cut into it. Don’t worry if your pan is slightly different from mine, just adjust the number of cookies per layer as needed.
Step-by-Step Instructions for Perfect Layers
Start by lining a 9×5 inch loaf pan with plastic wrap, leaving enough overhang on the sides to lift the whole cake out later. This trick makes serving so much cleaner and easier. Whip the cold heavy cream in a stand mixer until it forms medium peaks, which should take about 3 to 4 minutes on medium-high speed.
Add the Biscoff cookie butter, mascarpone, vanilla extract, powdered sugar, and salt to the whipped cream. Fold everything together gently but thoroughly until you have a smooth, uniform mixture. You want it thick enough to spread without running, but still light and airy.
Arrange a single layer of Biscoff cookies on the bottom of your prepared pan. Spread about one-quarter of the cream mixture over the cookies, smoothing it into an even layer. Repeat this process, alternating cookies and cream, until you reach the top of the pan. Finish with a layer of cookies, then wrap the whole thing tightly in plastic wrap.
Refrigerate this Speculoos Icebox Cake for at least 24 hours, though I prefer giving it a full day to ensure those cookies have softened completely. When you’re ready to serve, lift the cake out using the plastic wrap overhang and place it on a serving plate. Drizzle with warmed cookie butter and scatter crushed cookies on top for that finishing touch.

Pro Tips for the Best Biscoff Icebox Cake
Make sure your heavy cream is genuinely cold, straight from the fridge. Warm cream won’t whip properly and your layers will be soupy instead of firm. I’ve made this mistake before and learned my lesson the hard way.
Don’t skip the overnight chilling time for this Lotus Biscoff Icebox Cake. It’s tempting to dig in sooner, but those cookies need the full 24 hours to soften into that perfect cake-like texture. If you cut into it too early, you’ll end up with crunchy cookies instead of tender layers.
Use a sharp knife dipped in warm water for clean slices. Wipe the blade between cuts and you’ll get those beautiful, Instagram-worthy layers every time. This Biscoff Cookie Icebox Cake photographs beautifully when sliced properly.
Variations to Try
Swap the mascarpone for cream cheese if that’s what you have on hand. The texture will be slightly denser but still delicious. You could also fold in a tablespoon of espresso powder for a tiramisu-inspired version of this No Bake Biscoff Icebox Cake.
Add fresh berries between the layers for a fruity twist. Sliced strawberries or raspberries work particularly well with the warm spice notes in the Biscoff cookies. Just pat them dry first so excess moisture doesn’t thin out your cream.
Make individual portions by assembling this Biscoff Icebox Cake Recipe Easy version in small glasses or ramekins. Layer the cookies broken into pieces with the cream mixture, and you’ve got elegant single-serving desserts that look stunning.
Troubleshooting Common Issues
If your cake is too soft after chilling, your cream mixture might have been over-whipped or under-whipped. Aim for medium peaks that hold their shape but aren’t stiff and grainy. The consistency should be like thick pudding when you fold in the cookie butter.
Crunchy cookies after 24 hours usually mean not enough moisture in the cream layer. Make sure you’re spreading a generous amount over each cookie layer. The cookies need that liquid to absorb and soften properly in this Butter Butter Icebox Cake.
Difficulty unmolding? Run a thin knife around the edges of the pan before lifting with the plastic wrap. If the cake sticks, let it sit at room temperature for 5 minutes to loosen up before attempting again.
Ingredient Substitutions
Heavy cream can be substituted with full-fat coconut cream for a dairy-free version of this Biscoff Cookie Butter Icebox Cake. Chill the coconut cream overnight, then whip only the solid part that separates on top.
Mascarpone can be replaced with an equal amount of full-fat Greek yogurt for a lighter option, though the texture will be slightly less rich. You could also use cream cheese softened to room temperature for similar stability.
If you can’t find Lotus Biscoff cookies, any spiced speculoos cookies will work in this Speculoos Icebox Cake. The flavor profile is nearly identical, and you’ll still get that characteristic caramelized spice taste.
Storage and Serving Suggestions
This No-Bake Cookie Butter Icebox Cake keeps beautifully in the refrigerator for up to 3 days when covered tightly with plastic wrap. The flavors actually improve after the first day as everything continues to meld together. Just be aware that the cookies will continue softening, so the texture changes slightly over time.
Serve this Biscoff Icebox Cake chilled, but let it sit out for about 10 minutes before slicing for the creamiest texture. It pairs wonderfully with coffee or tea for an afternoon treat, or as a dessert after dinner. A scoop of vanilla ice cream on the side takes it to the next level of indulgence.
For special occasions, garnish each slice with a dollop of freshly whipped cream and a whole Biscoff cookie standing upright. Drizzle with warmed cookie butter right before serving for that glossy, professional finish that makes this Lotus Biscoff Icebox Cake look bakery-quality.
Frequently Asked Questions
Can I make this Biscoff Icebox Cake ahead of time? Absolutely! This dessert actually benefits from being made a day in advance. You can prepare it up to 3 days before serving, making it perfect for parties and gatherings.
Does this No-Bake Cookie Butter Icebox Cake need to be refrigerated? Yes, it must be kept refrigerated at all times. The cream filling contains dairy and needs to stay cold for food safety and proper texture.
Can I freeze this Biscoff Cookie Icebox Cake? While you can freeze it for up to 2 months, the texture of the cookies may change slightly upon thawing. If freezing, wrap tightly and thaw overnight in the refrigerator before serving.
How many servings does this Lotus Biscoff Icebox Cake make? This recipe yields about 8 to 10 generous slices, depending on how thick you cut them. It’s perfect for a dinner party or family gathering.
What’s the difference between Biscoff and Speculoos? Biscoff is the brand name for Lotus brand speculoos cookies. They’re essentially the same type of spiced shortcrust biscuit, so you can use them interchangeably in this Speculoos Icebox Cake recipe.
Can I use a different pan size? Yes, though the number of cookies per layer will vary. A 9×5 loaf pan works best for this Biscoff Icebox Cake Recipe Easy version, but you can adjust based on what you have available.
Is there a way to make this No Bake Biscoff Icebox Cake less sweet? You can reduce the powdered sugar to 1 tablespoon, or use unsweetened whipped cream. The cookies themselves are already sweet, so the overall dessert will still have plenty of sweetness.
No-Bake Cookie Butter Icebox Cake

Equipment
- 9×5 inch loaf pan
- Stand mixer or hand mixer
- Mixing bowls
- Plastic wrap
- Spatula
Ingredients
- 2 cups heavy cream cold
- 1/2 cup Lotus Biscoff cookie butter spread plus extra for drizzling
- 1/3 cup mascarpone cheese room temperature
- 1 teaspoon pure vanilla extract
- 2 tablespoons powdered sugar
- 1 pinch kosher salt
- 2 packages Lotus Biscoff cookies about 64 cookies
- 1/4 cup crushed Biscoff cookies for garnish
Instructions
- Line a 9×5 inch loaf pan with plastic wrap, leaving overhang on all sides for easy removal later.
- Whip the cold heavy cream in a stand mixer fitted with whisk attachment until medium peaks form, about 3-4 minutes on medium-high speed.
- Add Biscoff cookie butter, mascarpone, vanilla extract, powdered sugar, and salt to the whipped cream. Fold gently until smooth and well combined.
- Arrange a single layer of Biscoff cookies on the bottom of the prepared pan, fitting them snugly without gaps.
- Spread about one-quarter of the cream mixture over the cookies in an even layer. Repeat layering cookies and cream until you reach the top, ending with cookies.
- Wrap tightly with plastic wrap and refrigerate for at least 24 hours to allow cookies to soften.
- Lift cake out using plastic wrap and place on serving plate. Drizzle with warmed cookie butter and garnish with crushed cookies before slicing.
Notes
- For clean slices, dip a sharp knife in warm water and wipe between cuts.
- Cake can be made up to 3 days in advance and stored covered in refrigerator.
- Let cake sit at room temperature for 10 minutes before serving for creamiest texture.
- If cookies remain crunchy after 24 hours, they need more moisture – ensure generous cream layers.