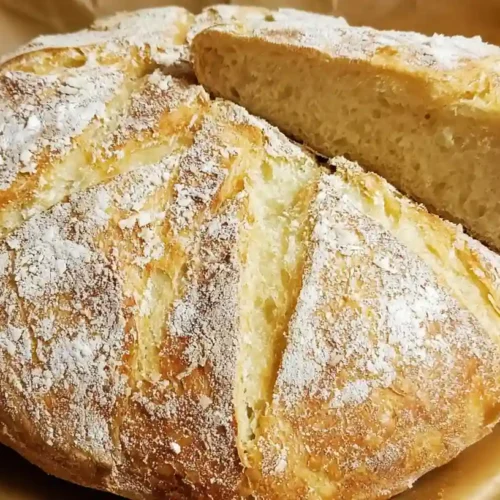
There is something about pulling a hot loaf of rustic French bread out of the oven that feels genuinely satisfying. The crust crackles. The inside is soft and full of irregular holes. And the whole kitchen smells like a bakery for about an hour. This rustic bread recipe skips the complicated techniques and gives you a reliable, beautiful loaf using simple pantry ingredients, a bit of patience, and a Dutch oven you probably already own.
No stand mixer required. No bread-baking experience needed. Just flour, water, yeast, and salt, and a little time for the dough to do its thing overnight.
What Makes This Rustic French Bread Worth Making
Most homemade bread recipes ask for a lot of kneading or special equipment. This one does not. The dough is a high-hydration, no-knead style that develops structure through a long, slow rise rather than muscle work. Baking it in a Dutch oven traps steam around the loaf during the first part of baking, which is exactly what gives French artisan bread its signature crackly, blistered crust. You get bakery results from a home oven, which is pretty great.
Ingredients for This Rustic French Bread Recipe
- 3 cups (360g) bread flour, plus more for dusting
- 1 and 1/4 teaspoons fine sea salt
- 1/2 teaspoon active dry yeast
- 1 and 1/2 cups (350ml) lukewarm water
That is genuinely everything. The simplicity is part of what makes this rustic bread recipe so approachable. Bread flour gives you more gluten development and a chewier crumb, but all-purpose flour works too if that is what you have on hand.
How to Make Dutch Oven French Bread, Step by Step
- In a large bowl, whisk together the flour, salt, and yeast.
- Pour in the lukewarm water and stir with a wooden spoon until a shaggy, sticky dough forms. Do not knead it.
- Cover the bowl tightly with plastic wrap and leave at room temperature for 12 to 18 hours. The dough should be bubbly and nearly doubled.
- Flour a work surface generously and turn the dough out. Fold it onto itself a few times, then shape it loosely into a ball.
- Place the dough on a floured sheet of parchment paper, cover with a kitchen towel, and rest for 1 to 2 hours.
- About 30 minutes before baking, place your Dutch oven (with the lid) inside the oven and preheat to 230°C (450°F).
- Score the top of the dough with a sharp knife or bread lame, making one deep slash across the top.
- Carefully lower the dough (on the parchment) into the hot Dutch oven. Put the lid on and bake for 30 minutes.
- Remove the lid and bake for another 15 to 20 minutes until the crust is deeply golden and the loaf sounds hollow when tapped on the bottom.
- Cool on a wire rack for at least 30 minutes before slicing.

Ingredient Swaps and Variations
If you want to make two loaves of artisan bread at once, simply double the recipe and divide the dough before shaping. Each loaf will need its own Dutch oven, or you can bake them back to back. For a simple sourdough French bread version, replace the commercial yeast with 2 tablespoons of active sourdough starter and extend the rise to 18 to 24 hours. The flavor gets noticeably more complex with just that one swap. You can also mix in a handful of fresh rosemary and some coarse sea salt on top before scoring for a flavored French oven bread variation.
Pro Tips for a Better Crust and Crumb
The Dutch oven is what makes rustic artisan bread loaves work at home. It mimics a professional steam-injected oven by trapping moisture released from the dough. Preheating it empty is important, not optional. A cold Dutch oven will give you a pale, soft crust instead of that crackly, professional finish. Also, do not skip the cooling time. Bread continues to set as it cools, and cutting too early gives you a gummy interior even if the outside looks done.
Troubleshooting Common Problems
Dough too sticky to shape? That is normal with high-hydration dough. Use a bench scraper and well-floured hands rather than adding more flour, which will tighten the crumb. Crust soft after cooling? Your oven temperature may have been too low, or the lid came off too early. Dense loaf with small holes? The dough likely under-fermented. If your kitchen is cold, let it rise longer, sometimes up to 20 hours works better in winter. Flat loaf that spread sideways? Shape it a bit tighter next time and make sure the resting surface is well floured.
Storing and Serving Your Bread
This French bread Dutch oven loaf is best on the day it is baked, ideally within the first 4 to 6 hours. After that, store it cut-side down on a cutting board or wrapped loosely in a clean kitchen towel. Avoid plastic bags, they trap moisture and soften the crust quickly. For longer storage, slice the cooled loaf and freeze it in a zip bag for up to 2 months. Reheat slices directly in a toaster or a 180°C (350°F) oven for 8 to 10 minutes. Serve it with good butter, olive oil, soup, or alongside a cheese board.
FAQ
Can I make this without a Dutch oven?
Yes, but the crust will be less crackly. Place the dough on a preheated baking stone or heavy sheet pan, and put a small oven-safe pan of hot water on the rack below to create some steam.
Why does the dough feel so wet and sticky?
High hydration is intentional. It creates the open, airy crumb you see in French artisan bread. Handle it gently with floured tools and resist the urge to add more flour.
How long does the first rise need to be?
At least 12 hours, up to 18. A longer, slower rise develops more flavor. An overnight rise starting in the evening is the most practical approach for most home bakers.
Can I use instant yeast instead of active dry?
Yes. Use the same amount. Instant yeast does not need to be dissolved first, so you can mix it directly with the dry ingredients.
What size Dutch oven works best for this recipe?
A 5 to 6 quart round Dutch oven is ideal. Smaller ones can restrict the rise and give you a more compact loaf. If yours is oval, just shape the dough to match.
Rustic French Bread
Equipment
- Dutch Oven (5-6 quart)
- Large mixing bowl
- Parchment paper
- Wire rack
Ingredients
- 3 cups bread flour plus extra for dusting; all-purpose works too
- 1 1/4 tsp fine sea salt
- 1/2 tsp active dry yeast instant yeast works too
- 1 1/2 cups lukewarm water about 350ml
Instructions
- Mix the flour, salt, and yeast together in a large bowl. Pour in the lukewarm water and stir until a shaggy dough forms. Do not knead.
- Cover the bowl with plastic wrap and leave at room temperature for 12 to 18 hours until the dough is bubbly and nearly doubled.
- Turn the dough onto a well-floured surface. Fold it onto itself a few times and shape loosely into a ball.
- Place the dough on floured parchment paper, cover with a kitchen towel, and rest for 1 to 2 hours.
- Preheat your oven to 230°C (450°F) with the Dutch oven and lid inside for 30 minutes.
- Score the top of the dough with one deep slash using a sharp knife or bread lame.
- Lower the dough on the parchment into the hot Dutch oven. Cover and bake for 30 minutes.
- Remove the lid and bake for another 15 to 20 minutes until the crust is deeply golden. The loaf should sound hollow when tapped on the bottom.
- Cool on a wire rack for at least 30 minutes before slicing.
Notes
- Long overnight rise (12-18 hours) is key for flavor and texture.
- Do not skip preheating the Dutch oven – it is essential for crust quality.
- For a sourdough version, replace yeast with 2 tbsp active starter and extend rise to 18-24 hours.
- Store cut-side down wrapped in a kitchen towel, not plastic.
- Freeze sliced leftovers for up to 2 months.